Once you have been added to the MyProsperity portal you will receive an invitation via email, if you can’t see this in your inbox, please check your junk or spam folder.
By following the below steps, you can quickly and easily activate and use your account.
1. When you have received your invitation via email, please click ’Activate’ within the body ofthe email.

2. A new browser page will open, and you will be taken to the ‘Activate your account’ screen.

Field 1- Your display name (mandatory): This field is prefilled with your name with DFKE
Field 2 & 3- Password / Password confirmation (mandatory): The password must contain the following:
– 6 characters or more
– 1 lower case letter
– 1 upper case letter
– 1 number
– 1 special character (! $@#%^&*?) ” ~” symbol will be not supported.
– Password must not begin with ‘<‘
As you enter your password, you will see the requirements that have been met will change to green with a tick beside them. For the password to be accepted, all criteria must be showing green.
Field 4 – Date of birth (optional): Click on this field and a popup calendar is shown so you can easily locate and click on the appropriate date – once clicked it will be filled in in the correct format.
Field 5- Phone number (optional): Phone number entered must meet the following rules:
– a “+” symbol is allowed but not required. If you choose to add the symbol, you may only add it at the start of your phone number.
– The phone number can be any length.
– Only numerical digits and the symbol “+” are allowed. You cannot use any alphabetical letters or any spaces between digits i.e. “+123 123 123” will occur an error whilst “+123123123” will be accepted.
Field 6 – Do you have a business? (mandatory): Choose one of the two options.
Field 7 – Terms and conditions (mandatory): The tick box needs to be checked, accepting the terms and conditions.
3. Only when all the mandatory fields noted above are completed successfully, the “Activate account” option be highlighted green and selectable. Click “Activate account” to proceed.

4. Upon clicking the activation button, you will be granted access to the portal and a confirmation page will appear confirming that the password has been created.
How to switch between “Individual” (personal) portal account and “Entity view” (so you can see eg company, trust or Super Fund documents).
- To switch to an entity view you will see a symbol at the top right hand of your screen, please select this and you will be able to switch your view between your individual portal account and your entity view.

- If you have an entity all documents that relate to that entity will be uploaded for you there to view and access.
- You may have multiple entities listed.
- Select the entity you would like to switch to.
- Click “Switch”.


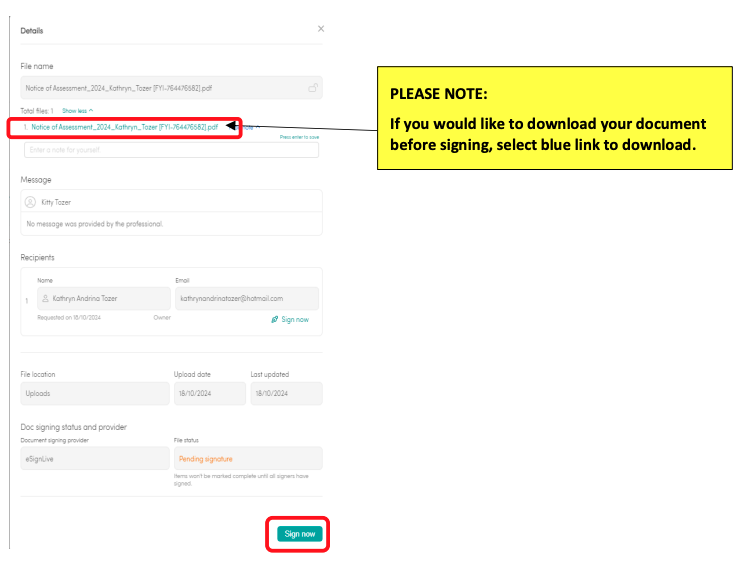
- You will receive an email when a document is uploaded for signing to your personalportal email address (this is used as your login).
- Select “Sign now” and follow the prompts to sign your documents
Once you click “sign now” you will be taken to the document to sign you will be able to review the document here while signing also.
If you would prefer to download the document to review before signing simply select the blue hyper link to download the document to your computer.
Select Sign button, the document will take you through until you have signed all required fields.
- Select confirm
- Select Next
- Once you have followed all the prompts you will be taken back to the MyProsperity portal where you can download your document for your reference.


Your login email address (which also serves as your username and primary contact information) can be updated in the Details area of your portal.
To change your email address:
- In your client portal, Click the arrow next to your profile picture and select ‘User Settings’ from the drop down.
- Select Account settings >Change email.
- Enter your new login email address and current password, then click ‘Save changes’.
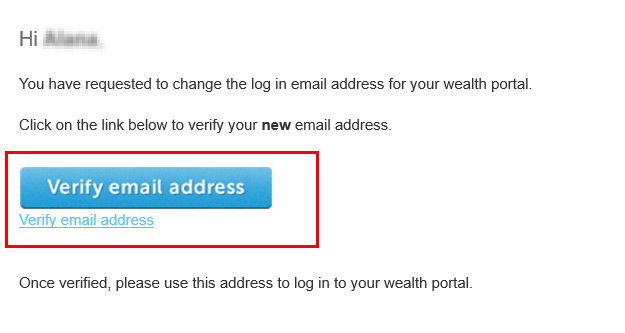
- To ensure the security of your account, this triggers a confirmation process. An email will be sent to your new email address.
- Locate the confirmation email and click on the link.
- The link takes you to the portal login screen where you can use your new email address and exisitng password to access your account.